Showing posts with label Dessert. Show all posts

Thursday, January 12, 2012

S'more Brownies


A major family favorite...
not to mention a hit at the bakesale!
I'll never forget when the kids told me these were
priced high and sold fast at school!
I won't lie,
I was pretty proud!

S'more Brownies
Makes 12 generous "inside" brownies
(We save the edges for snacking!)

Ingredients

1 pkg. Betty Crocker family-size brownie mix, unprepared
1/4 c brown sugar, unpacked
1/4 c unsweetened cocoa powder
3/4 c fat free milk
1/4 c vegetable oil
2 large eggs
4 tbs Nutella spread
3/4 c chocolate chips
4 sheets of graham cracker, crushed
1-2 c mini-marshmallows or 6 large marshmallows cut in half

Directions

Pre-heat the oven to 350 degrees and spray a 13 x 9 in. glass pan with non-stick cooking spray and set aside.

In a large mixing bowl combine the first five dry ingredients and create a well for the wet.  Add the milk, oil and eggs and whisk briskly in the well before incorporating into all of the dry.  Add the Nutella, whisking thoroughly, and pour into the pan.

Bake for 20-25 minutes, rotating the pan halfway through the baking time.  Your oven will most certainly vary from mine, so keep a close eye.  You're looking for brownies that are nearly done, but not quite.

Once they've reached that point, sprinkle the chocolate chips on top and return to the oven for one minute.  Gently spread the melted chips like a frosting over the surface. Sprinkle with the graham cracker and top with piles of the mini-marshmallows or the halved large marshmallows in the center of each brownie.

Set the oven to broil at 400 degrees and toast until the marshmallows are puffed and golden,
approximately 1 1/2 minutes.  Watch carefully-they burn quickly!

Let cool and then cut-making sure to stay away from the marshmallows (they don't cut well at all!).  Holler to the kiddies that the brownies are ready, and you have yourself one happy family!

{special note}

Because of the additional toppings added in stages, these brownies require some careful timing.  Just remember to pull them before they're done and you'll be good to go with the adding of everything else!

Thursday, March 17, 2011

Apple & Walnut Spice Cake with Malt Vinegar


I was feeling a bit Irish and thought of this
warm-you-up-by-the-hearth-of-the-fire recipe
using malt vinegar. 

It's a super-moist cake filled to the brim with all kinds of goodies (think raisins, walnuts...),
and the tartness of the vinegar cuts beautifully through the sweetness.

Apple & Walnut Spice Cake with Malt Vinegar

{Note: Nutritional info to come!}

Ingredients

Cake:
One box of yellow cake mix
1/2 c of water
1/2 c applesauce
1/3 cup plus 2 tablespoons of malt vinegar
1 egg
1/2 tsp cinnamon
1/4 tsp all-spice
1/4 tsp nutmeg
1/4 tsp ground whole cloves
1 pinch of salt
2 tbs unsalted butter, divided
1 Golden Delicious apple, peeled and medium-diced
1/3 c of raisins
1/2 c walnuts, chopped, toasted, and divided
1 Granny Smith apple, peeled and medium-diced

...

Crumb:
1/2 c regular oats, toasted
 1/3 c brown sugar
1/2 tsp cinnamon
1 pinch of salt
1 tsp vanilla extract
1 tbs malt vinegar

Directions

Yes, it seems like a lot of ingredients. 
And it is!
 
But I promise you this cake comes together in no time.

Pre-heat the oven to 350 degrees and spray a large 9 x 13 glass baking pan with cooking spray and set aside.

Heat a small saucepan over medium-high heat and melt one tablespoon of the butter.  Add the Golden Delicous apple and the raisins and saute for a few minutes until lightly browned.  Set aside to cool.

In a large mixing bowl,
combine the cake mix, water, applesauce, and malt vinegar whisking well.  Add the egg making sure it's fully incorporated.  Stir in the spices, and then add the cooled apples and raisin mixture, the walnuts, and the raw Granny Smith apple.  Pour into the baking pan and bake for 20-22 minutes or until the cake is almost set.  (Note: A toothpick inserted into the cake should come out slightly wet.).

While the cake is baking,
in a small bowl combine the toasted oats, remaining 1/4 c of walnuts, the brown sugar, cinnamon, and salt.  Mix well and stir in the vanilla extract and malt vinegar.  Finally, melt the remaining one tablespoon of butter and drizzle over the mixture stirring to combine.  When the cake is almost-but not quite-set, sprinkle the crumb mixture over the top and bake for a few minutes longer until done. (Note: A toothpick inserted into the cake should come out with plenty of crumbs.)

Allow the cake to cool before cutting into squares. 
Serve alone or with a scoop of vanilla ice cream and...

Enjoy!

Thursday, March 10, 2011

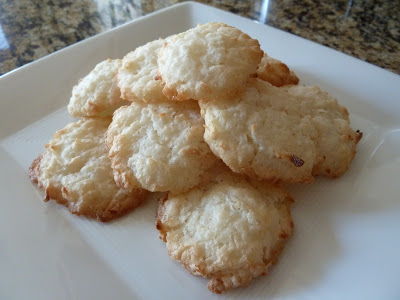
Lacy Coconut Cookies


A decadent dessert cookie with a crisp exterior and a moist and tender interior.
Perfect for the coconut lover in your home!

Lacy Coconut Cookies

Prep Time: 5 minutes
Cooking Time: 7 minutes
...
Serves: 12
Yield: 36 dainty cookies
...
Nutritional Info (per 3 dainty cookies):
136 calories; 4.17 fat grams

Ingredients

1 1/4 cups Angel Flake Sweetened Coconut
1 1/4 cups Sugar
2 large Egg Whites
1/2 cup All-purpose Flour

Directions

Pre-heat the oven to 350 degrees.

Prepare a large baking sheet with parchment paper that has been coated lightly with unsalted butter.

Whisk the egg whites in a medium size bowl until frothy. Add teh coconut and sugar until incorporated. Slowly add the flour, mixing by hand until the dough comes together, noting that the dough will remain very wet and sticky. Roll into small 3/4 in. balls, flatten slightly, and place two inches apart on the sheet.

Bake for 6-7 minutes, rotating the pan halfway, until the edges are golden brown.

Remove and allow to set for 3-4 minutes before moving to a cooling rack. Eat immediately or store in a a zip-lock bag for up to one week!

Enjoy!

Note:

You can make larger cookies, just adjust the cooking time accordingly (increase by a few minutes), and be careful to keep the cookies further apart on the sheet.

Variation:

To make Chocolate Coconut Cookies, add 2 tsp of unsweetened cocoa powder.

To make Chocolate Dipped or Chocolate Drizzled Coconut Cookies, melt bittersweet chocolate in a double boiler and dip or drizzle the cookies as desired.


Wednesday, March 2, 2011

Rocky Road Bark...And Equally Scrumptious Variations


My "go-to" recipe for a simple,
yet dazzling,
sweet treat.

Rocky Road Bark
Makes 24 pieces

Ingredients

8 oz semi-sweet chocolate chips
8 oz bittersweet chocolate, finely chopped
1 c toasted almonds, coursely chopped
1 1/2 c mini-marshmallows

Directions

Melt the chocolate in a heatproof bowl set over a pan of simmering water.

{note}

Make sure the bottom of the bowl doesn't sit in the water.

Line a sheet pan with parchment paper or foil.

Pour 1/2 of the almonds and marshmallows on the pan,
scattering evenly.

Pour half the melted chocolate onto the pan.

Add all but 1/4 of the remaining marshmallows and almonds
to the bowl,
and fold into the chocolate.

Pour the remaining chocolate into the pan,
spreading evenly with a rubber spatula.

{hint}

Work quickly to avoid melting the marshamallows from too much mixing into the chocolate,
and to avoid the chocolate from setting before your done.

Sprinkle with the remaining almonds and marshmallows,
pressing gently into the chocolate.

Set aside for 2 hours until firm,
or place in the refrigerator for 30 minutes.

Remove the parchment paper or foil from beneath the candy (it should peel away easily),
and cut into desired pieces.

{note}

I'm sure it's possible to create perfect cuts,
but I opt for haphazard pieces that are rustic in presentation!

Serve at room temperature
and enjoy!
{p.s.}

This is an extremely versatile recipe!

Substitute endless varieties of
dried fruits, nut, and candy.

Here are some additional ideas...

White Chocolate with
Pistachios

Dark Chocolate with
Dried Cherries & Toasted Walnuts

Milk Chocolate
with Toasted Hazelnuts & Dried Cranberries

Butterscotch with
Crushed Salted Pretzels & Roasted Pecans

White Chocolate with
Crushed Peppermint Candies


Sunday, December 12, 2010

Sea Salt & Caramel Truffles


As much as I love the taste of pure chocolate,
the sea-salt in this recipe adds a savory twist. 

The combination is refreshing,
and cuts nicely through the richness of the truffles.

Sea Salt & Caramel Truffles
Makes 30-35 Truffles

Ingredients

7 caramel squares, unwrapped and quartered
1 tbs of sea salt

Directions

Prepare the truffles as directed  in the "Simple Chocolate Truffles" recipe,
until you reach the stage where you've allowed the melted chocolate mixture to set.

Remove the mixture from the refrigerator
and let it rest for about 2-4 minutes
to allow for easier forming of the chocolate.
 
Have your salt and caramel quarters at the ready,
along with a prepared baking sheet lined with mini-candy cups. 

Begin to scoop your first truffle,
and prepare to get a little messy!

Typically,
you would scoop the chocolate mixture into your palm and roll it quickly into a ball. 

However,
because your essentially stuffing the truffles,
you'll need to scoop the mixture into the palm of your hand
to make a place in the center for your caramel and dash of salt to rest. 

Once you've done that,
close the mixture over the filling and proceed to roll into a ball
before rolling in your desired coatings.

{Again, I love using unsweetend cocoa and finely minced almonds.}

Set each truffle in a cup and refrigerate once more to set. 

When you're ready to serve,
remember,
room temperature is best!
   
Let them rest on the counter for at least 30 minutes and...

Enjoy!


Tuesday, November 9, 2010

Simple Chocolate Truffles


Easy, delicious, and to die for.

Though you may get a little messy, there's nothing better than...

Simple Chocolate Truffles

30-35 truffles

Ingredients
10 oz. bittersweet chocolate chips (I use Ghiradelli's)
3 tbs unsalted butter
1/2 c heavy cream
1 tbs light corn syrup

30-35 candy cup liners (Bonbon cups)

Flavorings (optional)
1 tbs orange extract
1 tbs raspberry extract
1 tbs almond extract
1 tbs Balsamic Vinegar

Coatings (optional)
1/2 c Dutch Processed Cocoa Powder
1/2 c Almonds, minced
1/2 c Pistachios, minced
1/2 c Minced Walnuts, toasted and minced

Directions
Microwave the chocolate and butter in a medium-sized glass mixing bowl at 20 second intervals, stirring frequently, until melted.  Set aside.

In a small saucepan, heat the heavy cream and corn syrup over medium heat until simmering. 

Pour over the chocolate mixture, cover, and let stand for 2 minutes.

Uncover and stir gently with a rubber spatula until the chocolate is well combined.

If using the optional flavorings, divide the chocolate mixture evenly into separate bowls and add while still warm.
Once combined, pour into flat tupperware containters, seal with a lid, and label (to tell which chocolate has what flavoring).
Place in the refrigerator for at least one hour or up to 24 hours.

{I use Glad sandwich containers and prefer to let the chocolate set overnight.}

When your ready to roll...

Line a rimmed baking sheet with your candy cup liners and set nearby.

Prepare your coatings as directed and place into shallow containers. 

{Note:  The more coatings you use, the less of each coating you'll need.  Adjust accordingly so you don't over-mince!}

Using a regular teaspoon or melon-baller, scrape the chocolate towards you.

{I find the melon-baller cumbersome, but others prefer it. You decide!}

Then, using your hands, quickly shape into balls and drop into the prepared coating. 

{Remember, your balls won't be perfect.  They're slightly mis-shapen thanks to the quickly melting chocolate and the speed with which you'll need to work.  I find the suble variation in shape part of the charm!}

When you have 5-7 truffles in each coating dish, gently roll the truffles in the dish until they are completely coated.  Transfer to a candy cup liner and set to work on the rest! 

Proceed until finished and then refrigerate to set.

Truffles are best at room temperature.  When ready to serve, remove from the refrigerator 30-minutes prior.

Last step?

Remember to sample one of each!


Tuesday, August 31, 2010

Berry Cream Purses


I remember when I was just a girl...

{yes, I'm thirty plus years now and can legitimately "reflect" on my "youth"}

...my mother would gather up my sister and I on cold winter mornings and we'd slosh up the steps to the La Bou bakery.  It's still around, franchises all over the city, but back then, it was a small hole-in-the-wall establishment that specialized in simple french pastry. 

She always ordered the same thing, and I smile just thinkig about it:
 
"One ham & cheese and one chocolate-filled crossaint, please." 

We sat,
looking out the rain-streaked window,
huddled over scalding hot chocolate and those irrestisable french pastries.

We warmed from the inside out.

And you know what?

The morning wasn't so dreary anymore.

In fact, it was WONDERFUL!

{Thanks Mom.}

You could say I'm a sucker for crossaints.

Can you blame me?

Here's a simple rendition that can be served for brunch, light dessert, or just because...

 Berry Cream Purses
Serves 5

Ingredients

1 roll of crossaint dough
1/4 c light cream cheese, room temperature
1/2 tsp vanilla extract
1 tbs sugar
3/4 c frozen berries (blueberries, raspberries, blackberries)
Cinnamon-sugar
Powdered sugar

Directions

Pre-heat oven to 375 degrees.

Unroll the crossaint dough onto an ungreased baking sheet.  Line up the seams and roll out thinly until it's one large sheet of crossaint dough.  Using a pizza cutter, cut into 10 roughly equal squares.

Lift the squares gently from the cookie sheet, being mindful that the dough will still try to separate at the seams, and evenly space the rectangles on the cookie sheet.

In a small bowl, beat the cream cheese, vanilla, & sugar until combined.

Spoon evenly into the center of each rectangle.


Top the cream with 3-4 frozen berries, and sprinkle with cinnamon-sugar.


Gather the rectangles into a purse, and pinch slightly to hold.

Bake for 11-12 minutes until golden brown and sprinkle generously with powdered sugar.

Enjoy!


Monday, August 30, 2010

Chocolate Chip Cookies...Lightened Up!


I'm all about the classics. 
Nail the brownie, the chocolate cake, the chocolate chip cookies...
and then you can pretty much do a play on anything and it will come out yummy. 

Even though you can tweak this recipe every-which way you like,
my hubby and the family love it old school.

The twist here...it's a lighter version.

I cancel out a whole stick of butter
and convert all the eggs to egg substitute.

The result? 

A darn tasty cookie! 
Yes, the texture is different than my classic recipe,
there's no denying that.

But the kiddos and hubby are too busy gobbling
them down to take notice!
A cookie and a glass of milk...
need I say more?

Chocolate Chip Cookies
Give or take 4-dozen large cookies
or
6-7 dozen small cookies

Ingredients

5 c all-purpose flour
2 tsp baking soda
1 tsp baking powder
1 1/2 tsp salt

1/2 c. (1 sticks) un-salted butter, softened
1 c. (1-stick) Crisco Butter-flavored Shortening
1 1/2 c granulated sugar
1 1/2 c packed brown sugar
3 tsp vanilla extract
1 c of egg substitute-
I do it all the time!

4-6 c. Nestle Toll House Semi-Sweet Morsels 
{Note}
This is a hard one to quantify, 
because I literally dump the chips in until the batter is a sea of chocolate...
it's beautiful, really.
2 1/2 c. coarsely chopped toasted walnuts (optional)

Directions

 Pre-heat oven to 375 degrees.
Using a medium bowl & a whisk:
Combine the flour, baking soda, & salt and set aside.

Using a mixer and the paddle attachment at medium speed:
Cream the butter and shortening until combined and then add the granulated sugar, brown sugar, vanilla and the eggs.

It should smell amazing at this point,
but resist the urge to lick.  

Why?!?

Because you haven't added the chocolate chips yet!

Patience, patience.

At low speed:
Gradually add the flour mixture to the creamed mixture until incorporated.
Finally add the morsels & nuts...and then taste!

Yum!

Scoop golf-ball size mounds of cookie dough onto a large un-greased cookie sheet-I use my ice cream scoop.  Place the mounds 2-inches apart, which is usually six cookies to one large baking sheet.  If you're making smaller cookies, you can place about 8-9 cookies per baking sheet.

Bake one sheet at a time at 375 degrees for 7-8 minutes.

Do not over bake!

This is the secret for moist, chewy cookies.
Remember, all ovens times vary, but look for cookies with only the slightest browning on top.
They will NOT look done, but they are.
 Once out of the oven, they'll continue to cook on the hot cookie sheet and will set nicely.

Let the cookies rest for at least 3-minutes on the baking sheet before even attempting to move them.  If you don't, you'll tear your cookies, and then you'll just have to eat them all, won't you? 

If your aim is to serve these bad boys, wait, and then move them to a cooling rack for approximately 7-10 minutes.  Be forewarned, they'll still be very soft, but with a large enough spatula to support them while you move them, they'll be just fine.

Once firm, you can stack the cookies in an air-tight container and they'll keep for 3-4 days.  Personally, I think they're best right out of the oven-but you can also keep them on hand in the pantry for a lunch treat or a quick snack. 

Other options: 
Bake, freeze, and thaw before serving. 
I love doing this when I have to run a treat up to the school.
 
Whatever you do...

Make...Eat...Eat...Eat,
and  yes:

 Exercise!

I'm not going to lie,
these are wickedly good and they'll will show it!

{Notes}

You can cut this recipe in half, but I find that the cookies are not quite the same!  Try making the whole batch and just freezing the dough for later.  You'll always need cookie dough!

Also, if you prefer smaller cookies, just adjust the baking time to 5-6 minutes and keep a close eye on them.

Keep in mind, the sky's the limit!
Substitute like crazy with whatever you want:
M&Ms, White Chocolate Chips,
Macadamia Nuts.

Make this cookie yours!

Enjoy!


Monday, June 28, 2010

Easiest Refereshments EVER!!!


So we all know how fast FHE rolls around,
and if you're anything like me,
you're always caught off guard for a dessert!

I know we don't have to be extravagant,
but it's always a highlight of the evening
so I don't like to disappoint.


What to do then when your little birdies are waiting?


Sundaes, of course!

IN YOUR MOUTH!


I guarantee it to be the

tastiest,

simplest,

&

 silliest

treat ever!


Even mom's and dad's love it!

Happy Family Home Evening!

{Owen was mad I wouldn't give him another sundae! 
It's either that or I have him in a headlock. 
Both could be true so take your pick!}

Wednesday, June 16, 2010

Homemade Popcornopolis


This recipe is so simple, so easy, and soooo delicious!

Pass on the super-expensive stuff at the store and make this at home!

Homemade Popcornopolis
 Serves 4 (generously)

Ingredients
1 bag of 97 % fat free microwave popcorn, popped
1/2 c semi-sweet chocolate chips, melted
1 1/2 c mini-marshmallows

Directions
In a large shallow pan, spread out the popcorn and allow to cool completely (5-7 minutes).

Sprinkle with marshmallows and drizzle evenly with the melted chocolate.


Refrigerate until the chocolate is set (10 minutes) and...

Enjoy!


Sunday, May 16, 2010

Simple Sugar Cookies


I needed a simple and easy sugar cookie recipe for my daughter's tea party that would yield fabulous, soft, and chewy cookies.  It was the day of the event, with only hours until the guests arrived, when I stumbled upon this recipe on allrecipes.com.  I adapted the recipe to what I had on hand, and because this was a no-need-to-chill-the-dough-in-the-fridge and a no-rolling-of-the-dough recipe, I had my cookies baked and cooled in plenty of time for the party!

Simple Sugar Cookies
Yields 24-36 Cookies

Instructions

1/2 cup shortening, butter-flavored
1 cup unsalted butter, softened
1 1/2 cups white sugar
2 eggs
2 teaspoons vanilla extract
3 1/2 cups all-purpose flour
2 teaspoons baking powder
1 teaspoon salt

Directions

Pre-heat your oven to 350 degrees.

Cream the shortening, butter, and sugar in a large mixing bowl.

Add the eggs and vanilla.

In a separate bowl, combine the dry ingredients, and then slowly add to the wet ingredients.
When combined, roll the dough in the palms of your hands into walnut-shaped balls and space evenly on an ungreased cookie sheet.
Bake for 9 minutes, or until the bottoms just start to brown.
Remember, do not overbake.  You want these babies to remain moist and chewy.

Enjoy!


Tuesday, April 27, 2010

Chocolate Orange Squares


If you're a chocolate lover like me, you'll like this recipe with fresh oranges which give the chocolate a rich depth of flavor. 

Chocolate Orange Squares

Makes 24 squares

Ingredients

One Pillsbury Chocolate Fudge Family Size Brownie Mix
1/2 c. Applesauce
1/4 c. Water
2 Eggs
1 tsp. Vanilla
2 tbs. Unsweetened Cocoa Powder
 2-3 tbs. Orange Zest (the zest of 1 1/2 large oranges)
3 tbs. Fresh Squeezed Orange Juice (juice of 1/2 an orange)
1 1/2 c. Semi-sweet Chocolate Chips, divided

Directions

Pre-heat your oven to 350 degrees and grease a 9 x 13 in. glass pan with Pam and set aside.

Mix all the ingredients, except the chocolate chips, in a large mixing bowl.

Pour into the pan and spread evenly.  Sprinkle with 1/2 c. of chocolate chips, and with a rubber spatula, press gently into the mix and smooth the top layer.  All the chocolate chips should now be just below the surface.

Bake for 20 minutes, or until set.

Sprinkle the remaining chips over the top and turn off the oven and close the door for one minute to allow them to melt.

Remove the brownies from the oven, and with a rubber spatula, gently spread the melted chocolate chips into a layer of frosting.  Use a light hand, so as not to tear the top of the brownies.

Let set, cut into small squares, and...

Enjoy!


Friday, March 12, 2010

S'more Science


I'm absolutely convinced
the best way to make a s'more is NOT over an open flame! 

I know! 

You die-hards will hate this post!


It's broiling them to perfection under 500 degrees of scorching heat.  

We used honey grahams,
 squares of Hazelnut Chocolate from IKEA
(TRY IT-YOU WILL LOVE IT!),
and baby mallows. 

Keep a real close eye on those babies,
but after a few minutes the mallows are golden,
the chocolate perfectly melty,
and the crackers crisp and crunchy!

Enjoy!

Saturday, February 20, 2010

Lemon Drop Cupcakes


While I love to bake from scratch,
I'm also a huge fan of prepared mixes. 

Sometimes the price is right and time is short,
making for the perfect opportunity to
get creative with something in a box!

Lemon Drop Cupcakes
Serves 24

Ingredients
1 Yellow Cake Mix
1 tsp. lemon zest
1tbsp. fresh lemon juice
Simple Lemon Syrup*
Whipped Lemon Frosting*

*Recipe follows...

Directions
Prepare cake mix as directed, adding the zest and lemon juice to the batter.  

Bake as desired, making a layered cake, a 9x13 sheet pan cake, or cupcakes.

Cool for 10-15 minutes on a wire rack if making layers or cupcakes.  If making a sheet cake, cool within the pan.

Using a spoon, spread the simple syrup over the top of the cakes, letting it soak in.
After 5 minutes, top with the prepared whipped frosting and serve immediately.

Refrigerate leftovers, to prevent the whipped frosting from wilting.

Simple Lemon Syrup

Ingredients
1/2 c. water
1 c. sugar
1 tsp. lemon zest
1 tbsp. fresh lemon juice

Directions
Pour the water and sugar into a saucepan over medium-high heat until it comes to a boil.  Do not stir.
Add the zest and juice, stirring to combine, and lower heat to low-medium allowing for the syrup to simmer and reduce.

After 5 minutes or so, the syrup should be reduced to the point where it is thicker in consistency (will coat a spoon).  Remove from heat and use as directed.

Whipped Lemon Frosting

Ingredients
1 oz. tub of light cool whip
3 prepared vanilla pudding snack cups or 
1 instant vanilla pudding mix prepared as directed for a pudding pie, reserving 1/2 for another use.
1 tsp. lemon zest
1 tsp. cooled lemon simple syrup

Directions
Combine all of the ingredients and refrigerate until ready to frost!

Top with powdered sugar and...enjoy!


Friday, February 19, 2010

Chocolate Ganache


Who doesn't love chocolate?  

This fabulous-and super easy!-recipe adapted from Alton Brown makes for an elegant presentation when paired with cupcakes and cakes.

Chocolate Ganache


Prep time: 10 minutes
Cook Time: 5 minutes


Ingredients
3 tablespoons corn syrup
6 ounces heavy cream
12 ounces dark or semi-sweet chocolate, chopped into small pieces
1/2 teaspoon vanilla extract
Directions
In a small saucepan combine the corn syrup and heavy cream. 


Bring to a simmer and add the chocolate. 


Stir until smooth. 


Remove from the heat and add the vanilla extract.


Place a cooling rack over a baking sheet.


If coating a cake, place cake on the rack and gently pour the ganache over the cake.  Use a spatula to spread as needed.  Allow 1 hour to set.


If preparing cupcakes, dip the tops of each cake into the ganache and set on the rack to set.

Tuesday, April 21, 2009

My Classic Chocolate Chip Cookies


I've had a few requests for my chocolate chip cookie recipe,
but I feel guilty because I can't really claim it as my own.
I basically stole the Nestle' Chocolate Chip Cookie recipe
and tweaked it to my liking!

Enjoy!

Olivia's Chocolate Chip Cookies
Give or take 4-dozen large cookies or
6-7 dozen small cookies

4 1/2 c. all-purpose flour
2 tsp. baking soda
1 1/2 tsp. salt
1 c. (2-sticks) un-salted butter, softened
1 c. (1-stick) Crisco Butter-flavored Shortening
1 1/2 c. granulated sugar
1 1/2 c. packed brown sugar
2 tsp. vanilla extract
4 large eggs

6 c. Nestle Toll House Semi-Sweet Morsels (or more!)
2 1/2 c. coarsely chopped toasted walnuts (optional)

Directions:
Using a medium bowl & a whisk:
Combine the flour, baking soda, & salt and set aside.

Stop:
Pre-heat oven to 375 degrees

Using a mixer and the paddle attachment (medium speed):
Cream the butter and shortening.
Add the granulated sugar, combine
Add the brown sugar, combine.
Add the vanilla and eggs, combine.
Scrape the bowl as needed.

At low speed:
Gradually add the flour mixture to the creamed mixture until incorporated.
Finally add the morsels & nuts.

Scoop golf-ball size mounds of cookie dough onto a large un-greased cookie sheet. Place cookie mounds 2-inches apart (I usually bake six cookies to one large baking sheet).

Bake one cookie sheet at a time at 375 degrees for 7-8 minutes. Do not over bake! This is the secret for moist, chewy cookies. Remember, all ovens times vary, but look for cookies with only the slightest browning on top. They will not look done, but they are. Keep in mind that once out of the oven, they will continue to cook on the hot cookie sheet.

Let cookies rest for 3-minutes on the cookie sheet, allowing them to set. Then transfer the cookies to a cooling rack for 7-minutes. Handle the cookies gently, they will still be very soft.

Once firm, you can stack the cookies in an air-tight container and they will keep for 5-7 days-I think.

The reason I'm not sure is because they don't last that long at our house!

Notes:

If you're trying to keep things on the lighter side,
try my Chocolate Chip Cookies...Lightened Up!
You can cut this recipe in half, but I find that the cookies are not quite the same!

Also, if you prefer smaller cookies, just adjust the baking time to 5-6 minutes and keep a close eye on them.